The ultimate step-by-step guide to garment manufacturing
From design process to mass production, you’ll learn all about the garment manufacturing industry and how you can optimize your own garment-making business.


From musicians selling merchandise to kids wearing t-shirts featuring a streamer you’ve never heard of — nowadays, it seems like everyone and their dog has a t-shirt to flog.
This article explores the lucrative garment manufacturing industry. If you’re looking to weave and stitch your way to success, you can use this step-by-step guide detailing the necessary steps other fashion designers and product developers must take when making garments. So, without further ado, let’s get straight into it.

Garment manufacturing overview
The garment manufacturing industry is one of the most important sectors of the global economy.
It employs around 92,000 workers in the US, and the global market size is estimated at $826 billion. There are many garment manufacturing processes, each with its own unique set of steps and equipment. The most common types of garments manufactured are:
- Shirts
- Pants
- Dresses
- Coats
- Underwear
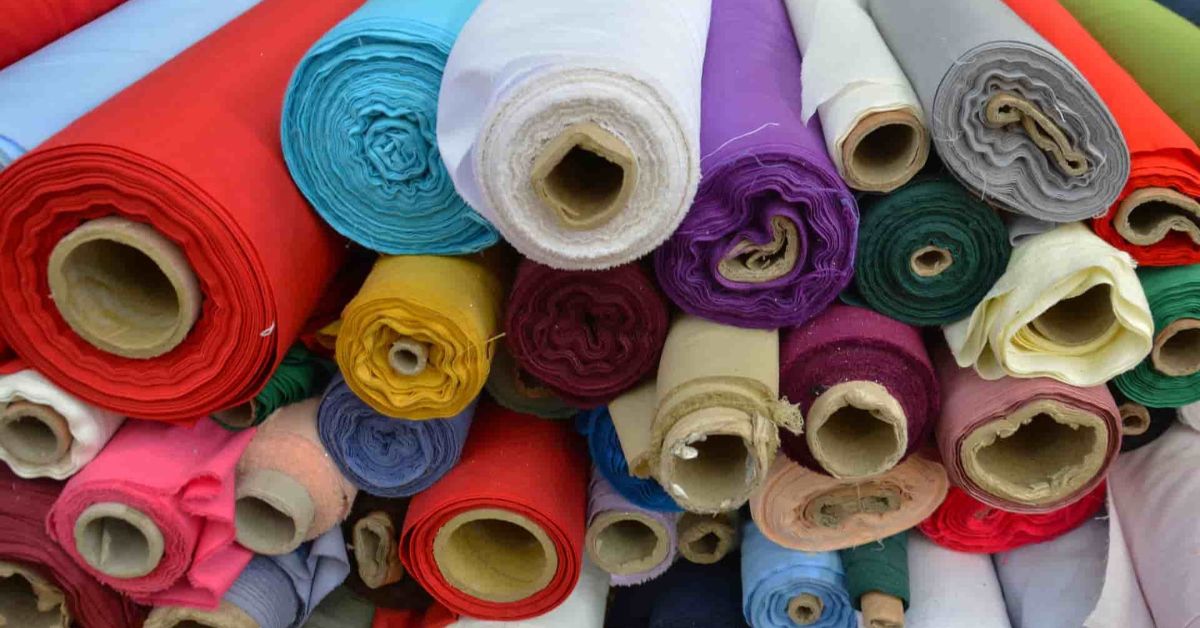
The first step in any garment manufacturing process is fabric selection.
The type of fabric used will determine the properties of the finished product, so it is important to choose wisely. Common fabrics used in garment manufacturing include:
- Cotton
- Polyester
- Wool
- Denim
Once the fabric has been selected, the fabric is spread and must be cut to the correct size and shape.
This is usually done with large fabric-cutting machines that can handle large bolts of fabric. The cut fabric is then sent to a sewing machine operator who assembles the garment using various techniques. The most common sewing techniques used in garment manufacturing are:
- Flat-felled seams
- French seams
- Serged seams
After the garment has been sewn together, it is often decorated with:
- Embroidery
- Applique
- Other embellishments
Finally, the garment is inspected for quality and then packaged for shipment.
Garment manufacturing is a complex process that requires skilled workers and sophisticated equipment. However, the result is typically a high-quality product ready to be worn by consumers.
What you need to know to work in garment production as a manufacturer?
If you’re interested in turning a hobby into a business or working on a garment production line, there are a few things you should know:
- The clothing industry is large and varied, so there are many different types of jobs available
- The work can be physically demanding, so you’ll need to be in good shape
- The pay is often not very high, so you’ll need to be prepared to work long hours for relatively little pay
That said, working in garment production can be a rewarding experience.
You’ll get to see firsthand how clothes are made, and you’ll have the satisfaction of knowing that you helped to create them. So, if you’re willing to put in the hard work, it can be a great career choice.

A step-by step guide to garment production
The garment production process can be complex and confusing, but it doesn’t have to be.
This step-by-step guide will unravel the mysteries of garment production and help you understand each step involved:
1. Design and development
Design and development in garment production is a process that involves creating new fabric designs and styles of clothing, as well as improving existing garments — the goal is to create products that are both stylish and functional.
The first step in design and development is to research current trends in fashion. This can be done by:
- Attending trade shows
- Reading fashion magazines
- Talking to trendsetters
Once you have an idea of what is popular, you can start sketching your own designs.
Once you have some sketches, the next step is to create prototypes. A preproduction sample is used to test how the garments look and feel on people. They will also help you determine if any manufacturing problems need to be addressed before mass production begins.
After the prototypes are created, the next step is to choose the right fabrics for your garments. There are many different types of fabrics available, and you need to select the ones that will work best for your products. You also need to consider the care instructions for each fabric.
Once you have selected the fabrics, the next step is to start manufacturing your garments.
This process can be done in-house or outsourced to a clothing manufacturer. If you outsource, you will need to find a reliable company with experience in garment production.
2. Pattern making
Once the design is finalized, a pattern must be created.
This is done by transferring the design onto paper or fabric and then cutting out the individual pieces that make up the garment. As with any other garment production process, the pattern maker is important for manufacturing. Patterns are used to create the basic shape of a garment — usually created by hand or with the help of a machine.
Once the pattern is complete, it is then used to cut fabric and construct the garment.
A few different methods can be used to create patterns, but the most common method is to use a paper or cardboard template.
This template is then used to trace the outline of the desired garment onto the fabric. Once the tracing is complete, the fabric is cut by the pattern maker along the traced lines and sewn together to form the finished garment.
Another common method for creating patterns is to use a computer-aided design (CAD) program.
This type of program allows the user to create a virtual model of the garment that they want to create. The advantage of using a CAD program is that it can be used to create multiple garments at once and can also be used to make changes to the pattern before it is cut into the fabric. No matter what method is used to create them, patterns are an important part of the garment manufacturing process.
They are used to ensure that each garment is the correct size and shape and to make sure that all of the pieces fit together correctly.
Without patterns, it would be very difficult to produce garments that look good and fit well.
3. Grading
Once the pattern is created, it must be graded to ensure that it will fit a range of sizes.
This is done by creating different versions of the pattern in different sizes. After the pattern is cut, the garment goes through a series of processes called “grading.” Grading is creating different sizes of a garment from a base size.
This is done by making small, gradual changes to the measurements of the pattern pieces.
There are two types of grading:
- Horizontal
- Vertical
Horizontal grading creates different widths from a base width, while vertical grading is used to create different lengths from a base length.
In general, horizontal grading is more common than vertical grading because it’s easier to make small changes to widths than it is to make small changes to lengths. For example, when making a shirt, it’s easy to add or remove a few inches to the width of the pattern pieces to create a larger or smaller shirt.
However, it’s more difficult to add or remove a few inches to the length of the pattern pieces.
Grading is an important part of garment production because it allows clothing manufacturers to produce a wide range of sizes from a limited number of pattern pieces.
This makes mass production of clothing more efficient and helps keep manufacturing costs down. Grading is typically done by computer these days, but it’s still important for designers and pattern makers to understand the basics of how it works.
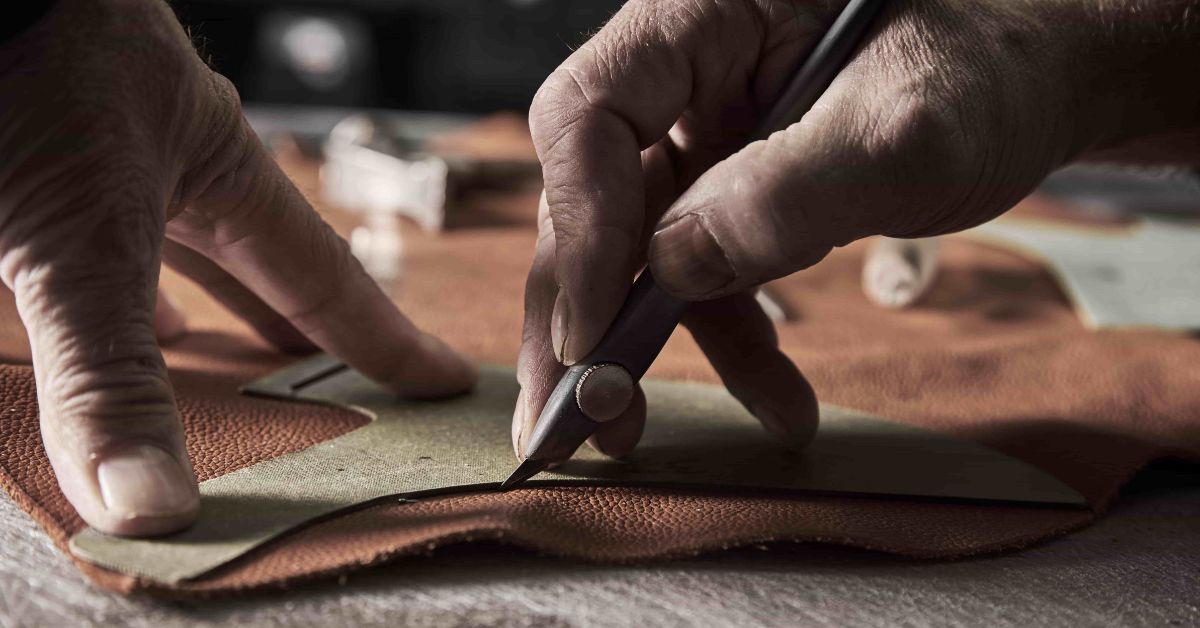
4. Marking and fabric cuttings
Marking and cutting process are two of the most important steps in garment production.
Marking is the process of creating lines or markings on fabric to indicate where to cut the fabric. Cutting is cutting the fabric along those lines or markings. There are a few different ways to mark fabric for cutting.
People mostly use chalk or a similar marking tool to create temporary lines or marks on the fabric.
This is typically done on larger pieces of fabric, such as bolts of cloth. Another way to mark fabric is to use a permanent marker. This is often used for smaller pieces of fabric, such as swatches.
Permanent markers can be helpful because they will not rub off or fade over time like chalk can.
Once the fabric is marked, it is time to cut it. This can be done with a rotary cutter, scissors, or a knife. It is important to use sharp tools when cutting fabric to avoid fraying or tearing the material.
Marking and fabric cuttings are two essential steps in garment production.
By marking and cutting the fabric properly, ensuring that your garments are well-made and look professional.
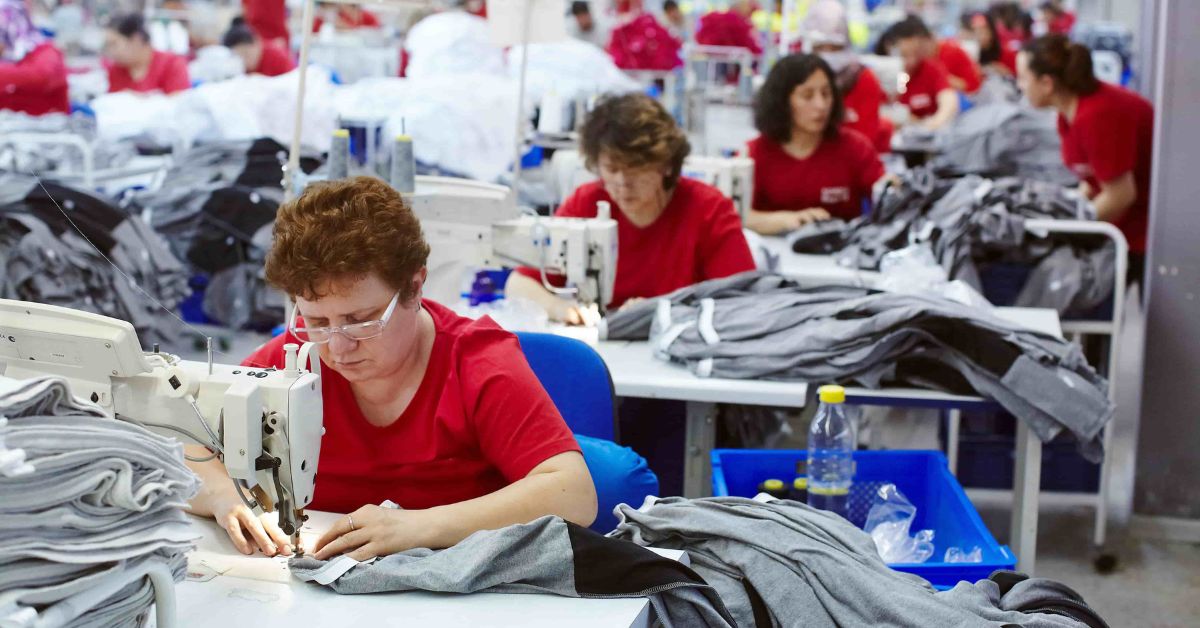
5. Sewing
The next step is sewing, which is when the individual pieces of the garment are put together using a needle and thread or a sewing machine.
The sewing process is one of the most important steps in garment production. It is responsible for joining together all the pieces of fabric that make up a garment. Without sewing, garments would simply fall apart — along with the world we imagine.
Sewing can be done by:
- Hand
- Machine
Hand sewing is slower and more labor-intensive than machine sewing, but it can produce very delicate and intricate stitches. Machine sewing is faster and more efficient, but it can sometimes be less precise than hand sewing. There are many different types of stitches that can be used in sewing.
The type of stitch used will depend on the fabric being sewn, the purpose of the stitch, and the preference of the sewer.
Some common types of stitches include:
- Straight stitches
- Zigzag stitches
- Buttonholes
Straight stitches
Straight stitches are simply stitches that are sewn in a straight line, and they can be used for just about any type of stitching.
These types of stitches are typically used for seams, hems, and other construction details.
An advantage of using straight stitches is that they’re extremely strong and durable. If a garment is subject to a lot of wear and tear, then it’s important to use a stitch that can withstand repeated use. Additionally, straight stitches are also relatively easy to cut and sew, making them ideal for mass customization.
Zigzag stitches
Zigzag stitches are one of the most basic and essential types of stitches used in garment manufacturing.
They are created by sewing a series of zigzag-shaped stitches in a straight line and can be used to:
- Finish raw edges
- Join two pieces of fabric together
- Create decorative embellishments
Zigzag stitches are also sometimes used to reinforce other types of stitches, such as buttonholes.
There are a few different ways to create zigzag stitches on a sewing machine. The most common method is to use a zigzag foot, which is a specialized attachment that helps guide the fabric under the needle in a zigzag pattern. Some machines also have a built-in zigzag stitch function that can be selected with the press of a button.
When zigzag sewing stitches, it’s important to use the correct needle size and thread weight.
A too-small needle can cause the stitches to break, while a too-heavy thread can create unnecessary bulk. The stitch width and length should also be adjusted to suit the project at hand – wider stitches are better for decorative purposes, while narrower stitches are more functional.
Zigzag stitches are relatively easy to master with a little practice and can open up a whole world of possibilities for your sewing projects.
Buttonholes
A buttonhole, also called a button loop or eyelet, is a small hole, usually round or oval, created in fabric so that a button may be passed through it and fastened.
Buttonholes may be sewn by hand or machine.
Hand-sewn buttonholes are considered more durable than machine-sewn ones and are more difficult to create. They are typically used on garments that will not be laundered often, such as suits and outerwear. Machine-sewn buttonholes are faster and easier to create than hand-sewn ones and are suitable for most garments, from casual wear to pajamas.
Buttonholes can be of different shapes, sizes, and finishes.
The most common shape is the round buttonhole, but oval and keyhole shapes are also popular. The buttonhole size should be slightly larger than the button it will be used with so that the button can easily be passed through it. Buttonholes can be finished in several ways, such as with a band of fabric (called a bartack) or binding bias tape.
They can also be left unfinished, which is common in children’s clothing.
Buttonholes are created before the garment is assembled. Once the buttonholes are in place, the buttons can be sewn on to correspond with them. Buttonholes are usually placed at strategic points on a garment, such as at the center front or cuff, to make it easier to fasten and unfasten the garment.
Creating perfect buttonholes can be challenging, but there are a few tips that can help:
- Use a sharp needle and good-quality thread — this will help to prevent skipped stitches
- Place a piece of stabilizer behind the fabric to prevent it from stretching or distorting as you sew
- Sew slowly and carefully, taking your time to create a neat and even buttonhole
- Practice on a scrap piece of fabric first to get the hang of it before sewing on your garment
Sewing is a critical part of garment production because it holds the fabric together.
Without sewing, garments would simply fall apart. Therefore, it is important to choose the right type of stitch for the fabric being sewn and the purpose of the stitch.
6. Finishing
The final step is pressing and finishing, which involves adding any embellishments or details to complete the garment. This can include:
- Buttons
- Snaps
- Zippers
- Appliqués.
The finishing process in garment manufacturing includes various methods used to improve the appearance and/or functionality of the fabric. Finishing can be performed on both woven and knitted fabrics. Common finishing process includes:
- Washing
- Bleaching
- Dyeing
- Printing
- Coating
Each of these clothing manufacturing processes can be done using either chemical or physical means.
In general, finishing production falls into one of three categories:
- Those that improve the fabric’s appearance — e.g., by making it softer or adding color
- Those that improve its performance — e.g., by making it more water-resistant
- Those that add special features — e.g., by adding fire-retardant properties
Washing
Washing is perhaps the most common type of finishing process. It is typically used to remove impurities from the fabric, such as:
- Sizing agents
- Residual oils
- Waxes
- Dirt or debris that may have been picked up during manufacturing
Washing can also be used to shrink the fabric or soften it.
Bleaching
Bleaching is another common finishing treatment. It is used to whiten the fabric and/or remove any unwanted colors.
Dyeing
Dyeing is a finishing treatment that is used to add color to the fabric.
Printing
Printing is a finishing treatment that involves applying a design or pattern to the fabric.
Coating
The coating is a finishing treatment that involves applying a thin layer of material (usually plastic) to the fabric’s surface.
This coating can be used for a variety of purposes, such as to make the fabric water-resistant or to add a bit of extra stiffness. Many other types of finishing treatments are not discussed here. These include treatments such as:
- Singing (used to remove loose fibers from the surface of the fabric)
- Mercerizing (used to improve the luster and strength of the fabric)
- Calendaring (used to smooth out the fabric)
How to reduce lead time in garment manufacturing in your business?
One way to reduce lead time in garment manufacturing is to streamline your operations.
This may involve implementing lean inventory principles and/or using just-in-time inventory management methods. Another way to reduce lead time is to improve your supply chain management. This includes ensuring that your suppliers can meet your delivery requirements and that you have adequate inventory levels.
Finally, you can also try to negotiate shorter lead times with your suppliers.
This may be possible if you have a good relationship with them and/or are willing to pay a premium for faster delivery. Lead time is an essential consideration in garment manufacturing. By streamlining your manufacturing operations, improving your supply chain management, and negotiating shorter lead times with your suppliers, you can help to reduce the overall lead time for your garments.
This will help to improve your efficiency and competitiveness.
What is lean manufacturing in the garment industry?
When it comes to applying lean principles in textile manufacturing, there are a few key things to keep in mind.
First, it’s important to identify and eliminate any non-value-added activities in the production process. This could include anything from unnecessary steps in the manufacturing process to excessive packaging. Next, it’s important to focus on streamlining the production process.
This could involve implementing Just-In-Time (JIT) production techniques or using lean tools such as value stream mapping.
Finally, it’s important to improve upon the lean manufacturing process continuously. This could mean making small changes regularly or making more significant changes periodically. Continuous improvement is essential to ensuring that the gains made through lean manufacturing are sustainable over the long term.
When done correctly, lean manufacturing can be a powerful tool for improving efficiency and reducing waste in the garment industry.
By following these tips, you can help your business reap the benefits of lean manufacturing.
Katana for garment manufacturing
Katana is the fashion ERP software for garment manufacturers that helps you manage every aspect of your garment business, from production planning to quality control and inventory management.
By using software to automate many of the tasks associated with running a garment business, you can improve efficiency and profitability. Software for garment manufacturing can help you in a number of ways, including:
Production planning runs
By using software to increase productivity, you can ensure that all the necessary raw materials and supplies are on hand when you need them. This can help avoid delays and disruptions in production.
Quality control
Katana can help you track manufacturing and quality control metrics and identify areas where improvements need to be made. This can help you produce higher-quality garments that meet customer expectations. Katana also supports manufacturers using contract manufacturing for private label clothing perhaps — you can still be in touch with the garment factories and be a part of the production process, regardless of where you are.
Inventory management
Katana can help you track inventory levels and reorder supplies when necessary. This can help you avoid stockouts and keep your business running smoothly.
Marketing and sales
Using software to manage your marketing and sales efforts allows you to reach more customers and boost profit margins.
You can use software to create customer databases, design marketing materials, and track sales metrics. Garment manufacturing software can help you streamline every aspect of your business, from production to sales. By using software to automate tasks, you can improve efficiency and profitability.
Want to see it for yourself? Request a demo and see all the ins and outs of how Katana can elevate your garment business to the next level.
Get inventory trends, news, and tips every month
Explore all categories
Get visibility over your sales and stock
Wave goodbye to uncertainty with Katana Cloud Inventory — AI-powered for total inventory control
