How to adjust inventory in QuickBooks Online
If you experience a change in your inventory that isn’t related to buying or selling goods, you will need to adjust inventory in QuickBooks. This article will give you a quick overview of making QuickBooks inventory adjustment without creating accounting errors.


Getting a gift from a friend, accidentally knocking over and breaking your favorite vase, leaving a carton of milk in the fridge too long, and having to throw it out — what do all of these things have in common?
In these cases, you’ve either gained or lost something without buying or selling anything. There’s no use crying over spilled milk, but the difference between spilling a glass of it in your own kitchen and spilling a container in your warehouse (apart from the quantity, of course) is that you have to account for it.
But it’s not enough to just write off the milk container from your inventory. If done incorrectly, it can lead to inaccuracies in your accounting. For example, the milk might be mistakenly assumed to have been sold instead of lost, which can lead to greater tax liability. This is where QuickBooks inventory adjustment comes in.
QuickBooks and accounting inventory adjustments
As you might have picked up in the introduction, inventory adjustments are corrections made to your inventory based on changes. An inventory adjustment can be an increase in your stock levels or a decrease.
There’s a bit of specialized language involved when making inventory adjustments. Let’s go over some terminology used for inventory adjustment in QuickBooks Online.
What is adjusting entry for inventory?
An adjusting entry for inventory is a journal entry that is meant to correct any discrepancies between the recorded inventory and the actual inventory.
It is done at the end of an accounting period, once you’ve finished your final inventory count, as you might need to update your books to reflect the actual inventory on-hand.
What is inventory quantity adjustment in QuickBooks Online?
An inventory quantity adjustment is essentially exactly what it sounds like: adjusting the actual quantity of inventory items in order to match any changes that have occurred.
An inventory quantity adjustment can be made manually in QuickBooks Online Plus and Advanced without needing to record a sale or purchase.

How do I record inventory adjustments in QuickBooks Online?
Here’s a step-by-step breakdown of how you can manually adjust inventory quantity in QuickBooks Online Advanced or Plus:
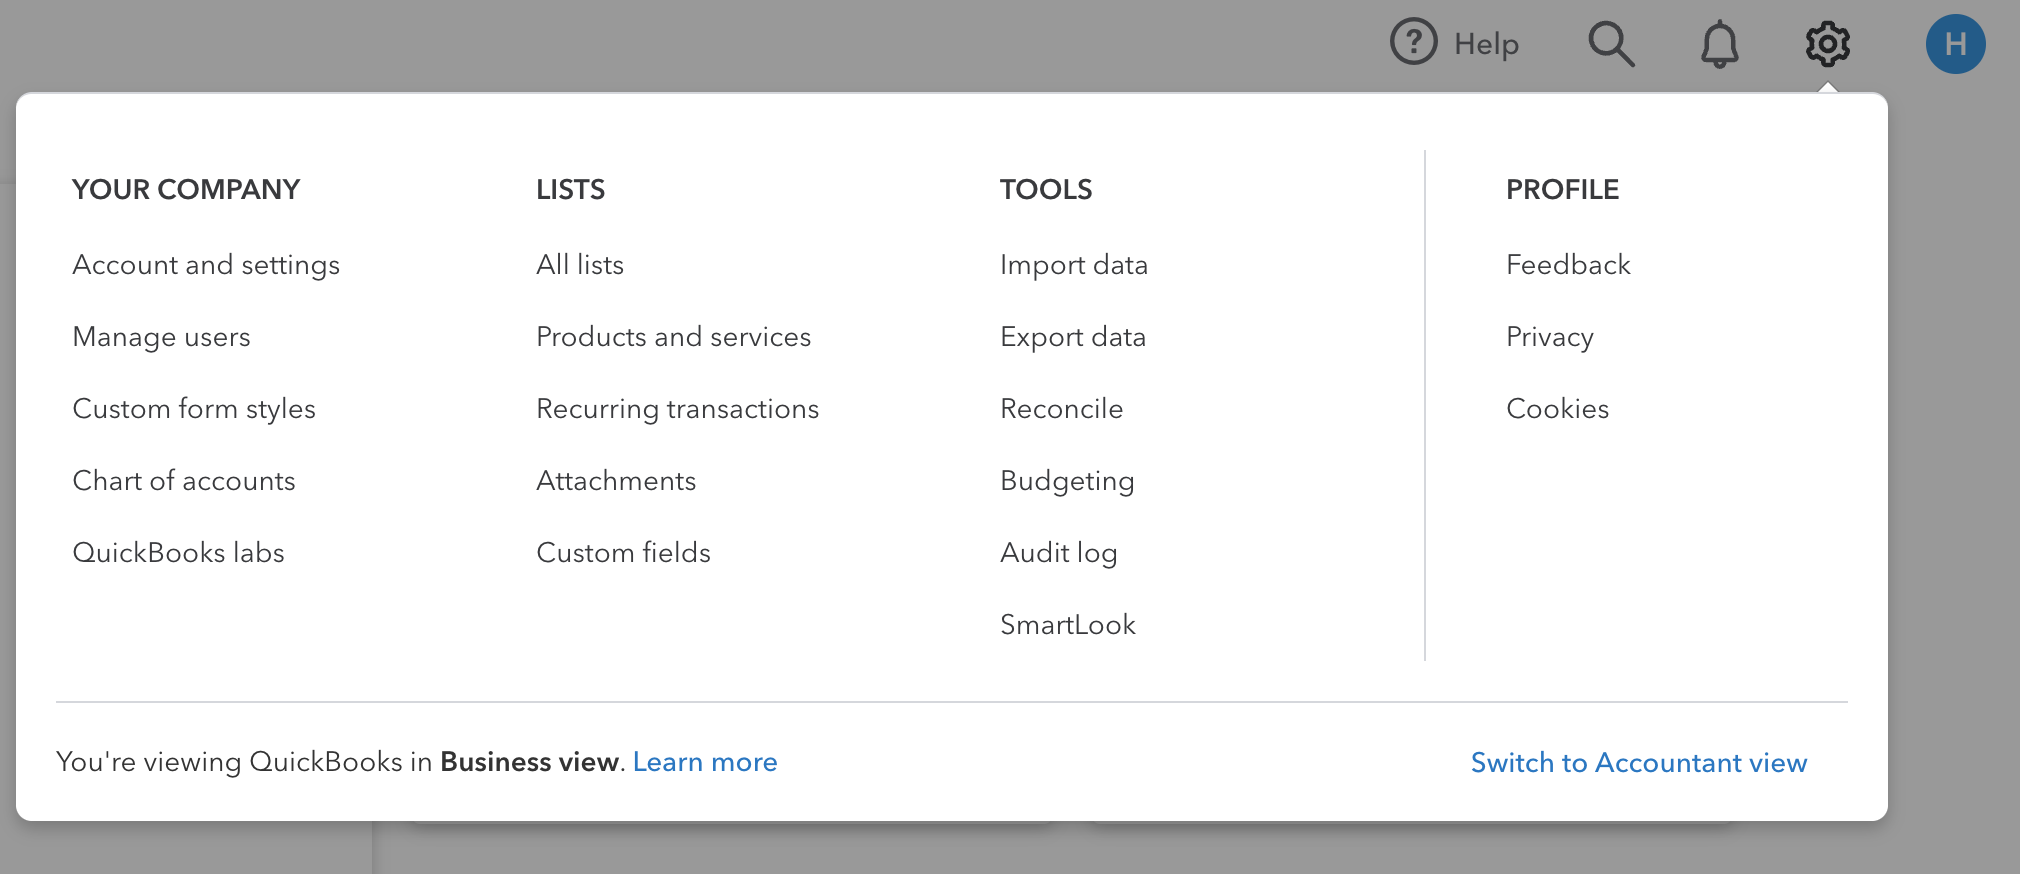
- Start by clicking the Gear icon on the top right in QuickBooks
- Select Products and services
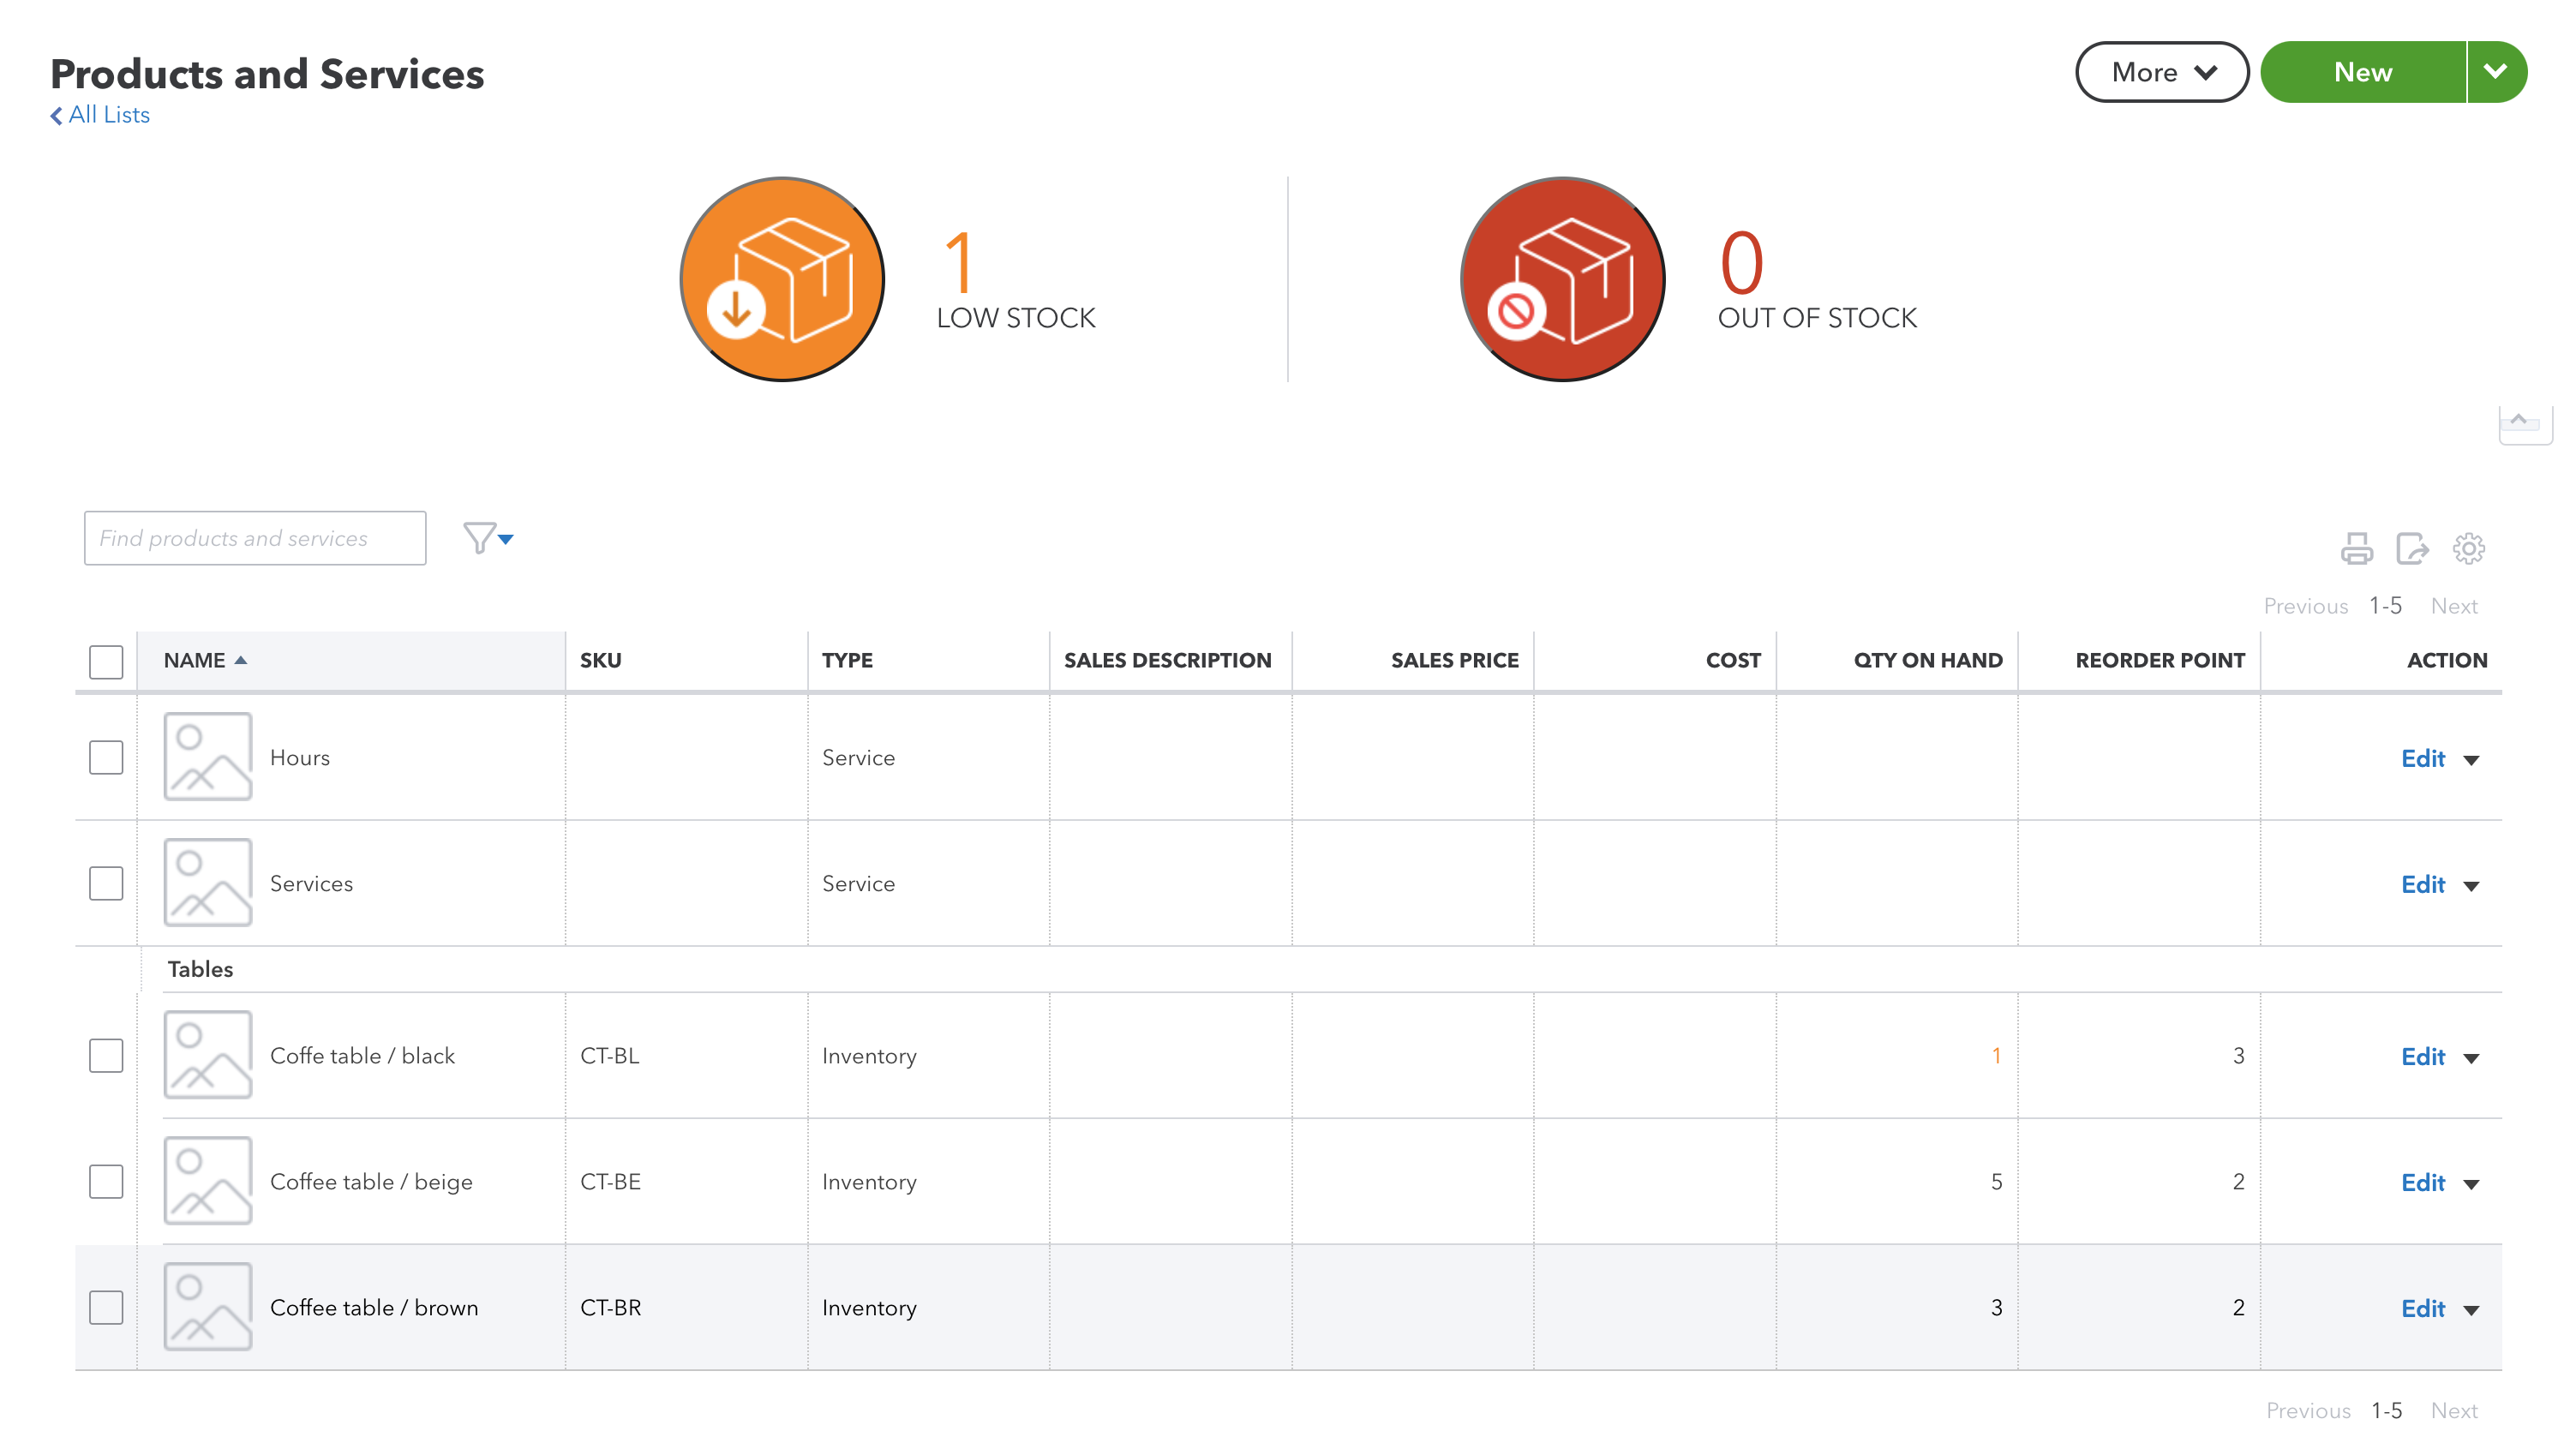
- You should see a page including all of your inventory items. Find the item you wish to adjust, then either double-click or select Edit under the Action column.
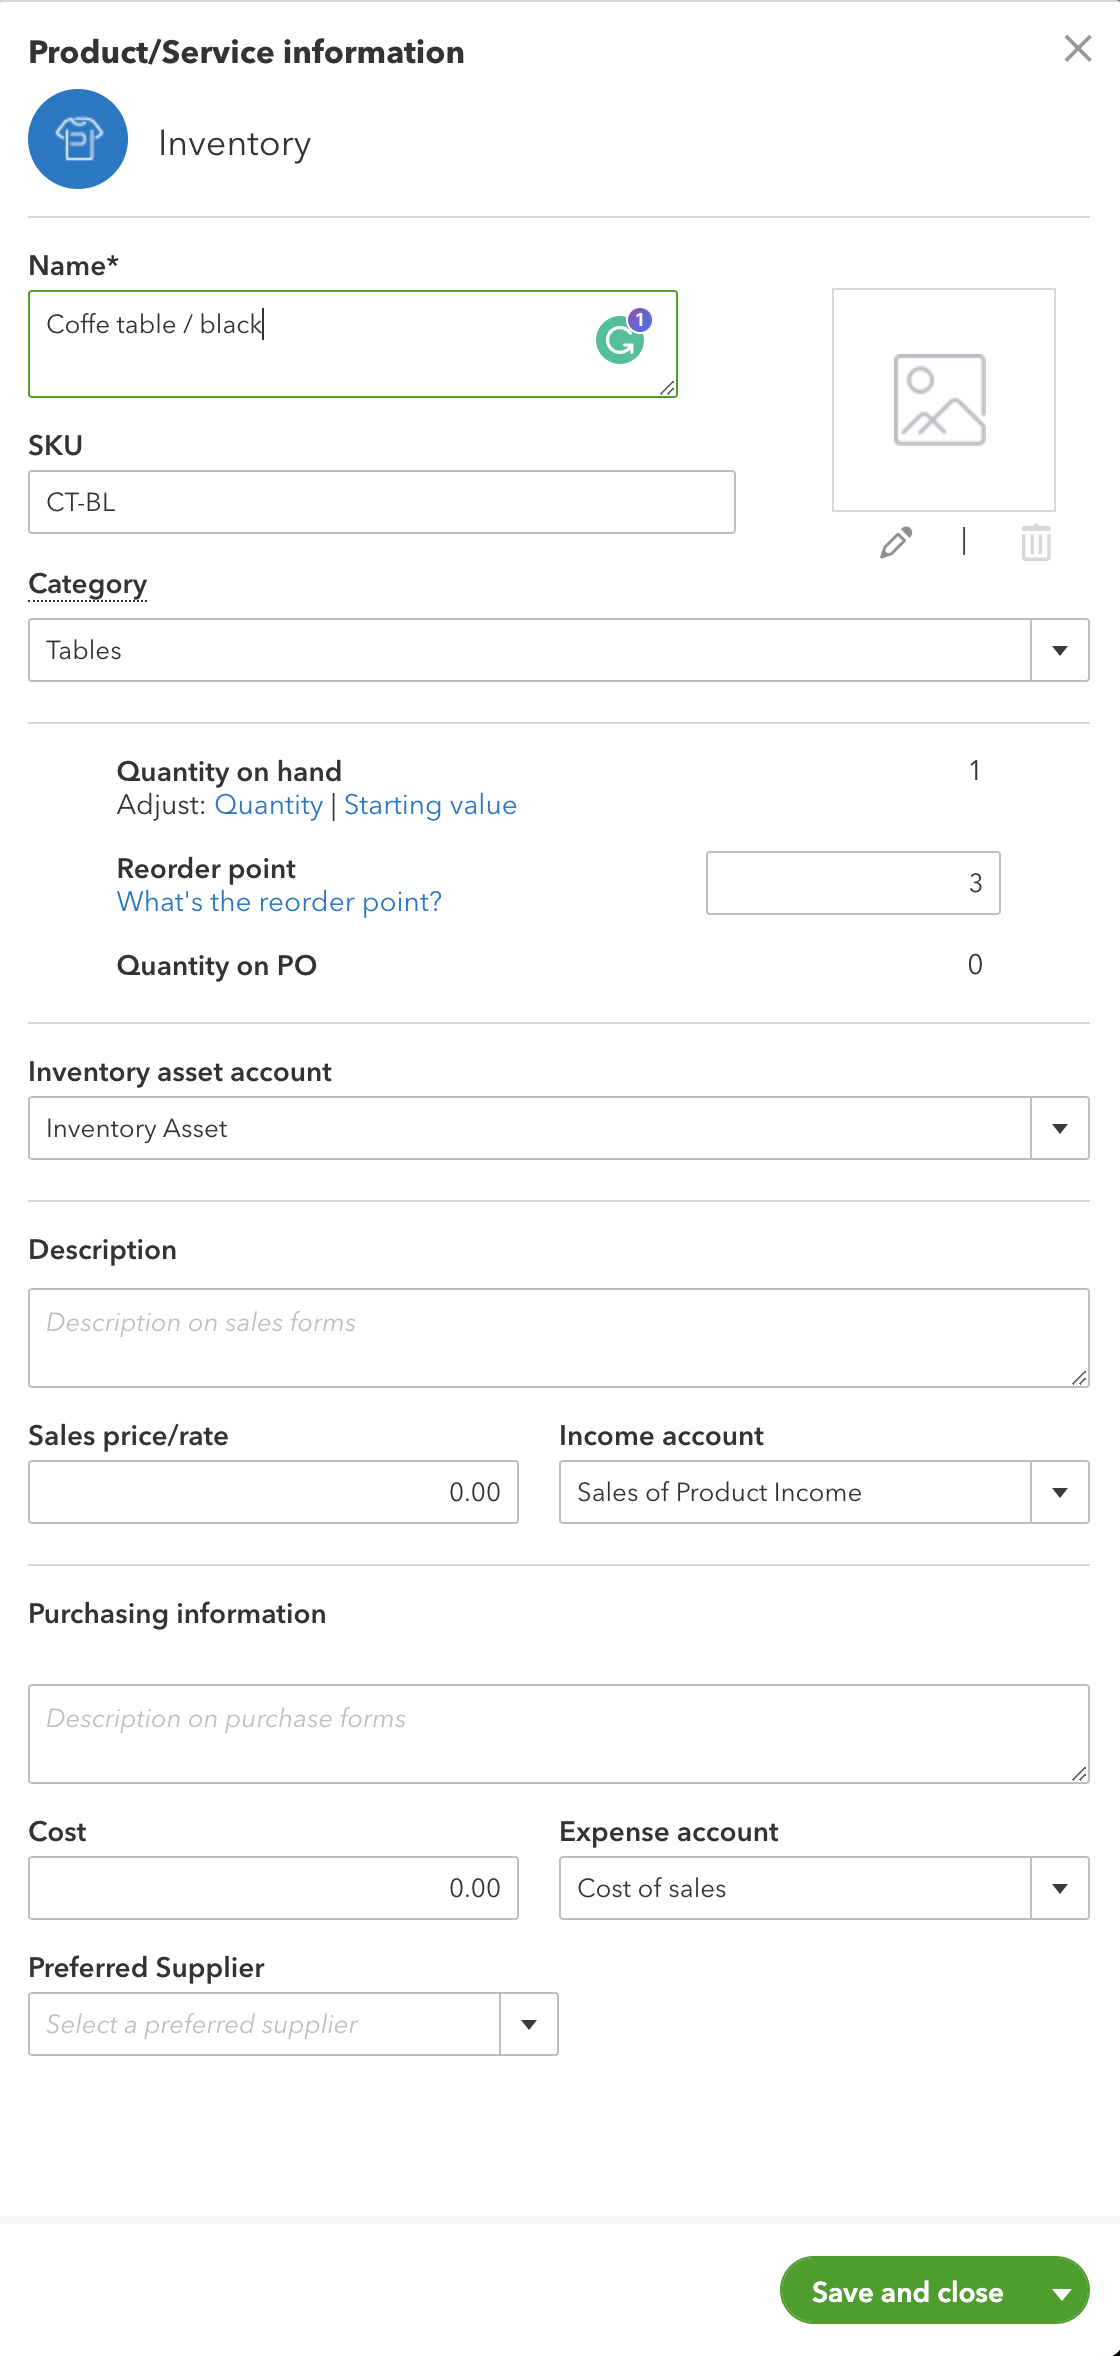
- Go to the Product/Service information section to your right. You’ll be able to find the quantity of item you have available in the Quantity on hand section.
- Right below Quantity on hand, you’ll see Adjust: Quantity | Starting Value. Select Quantity.
- You will be taken to the inventory quantity adjustment window. Enter the date of the adjustment in the Adjustment date field on the top left. You don’t usually need to worry about the reference number — it is updated automatically. However, you can change it manually if you need to.
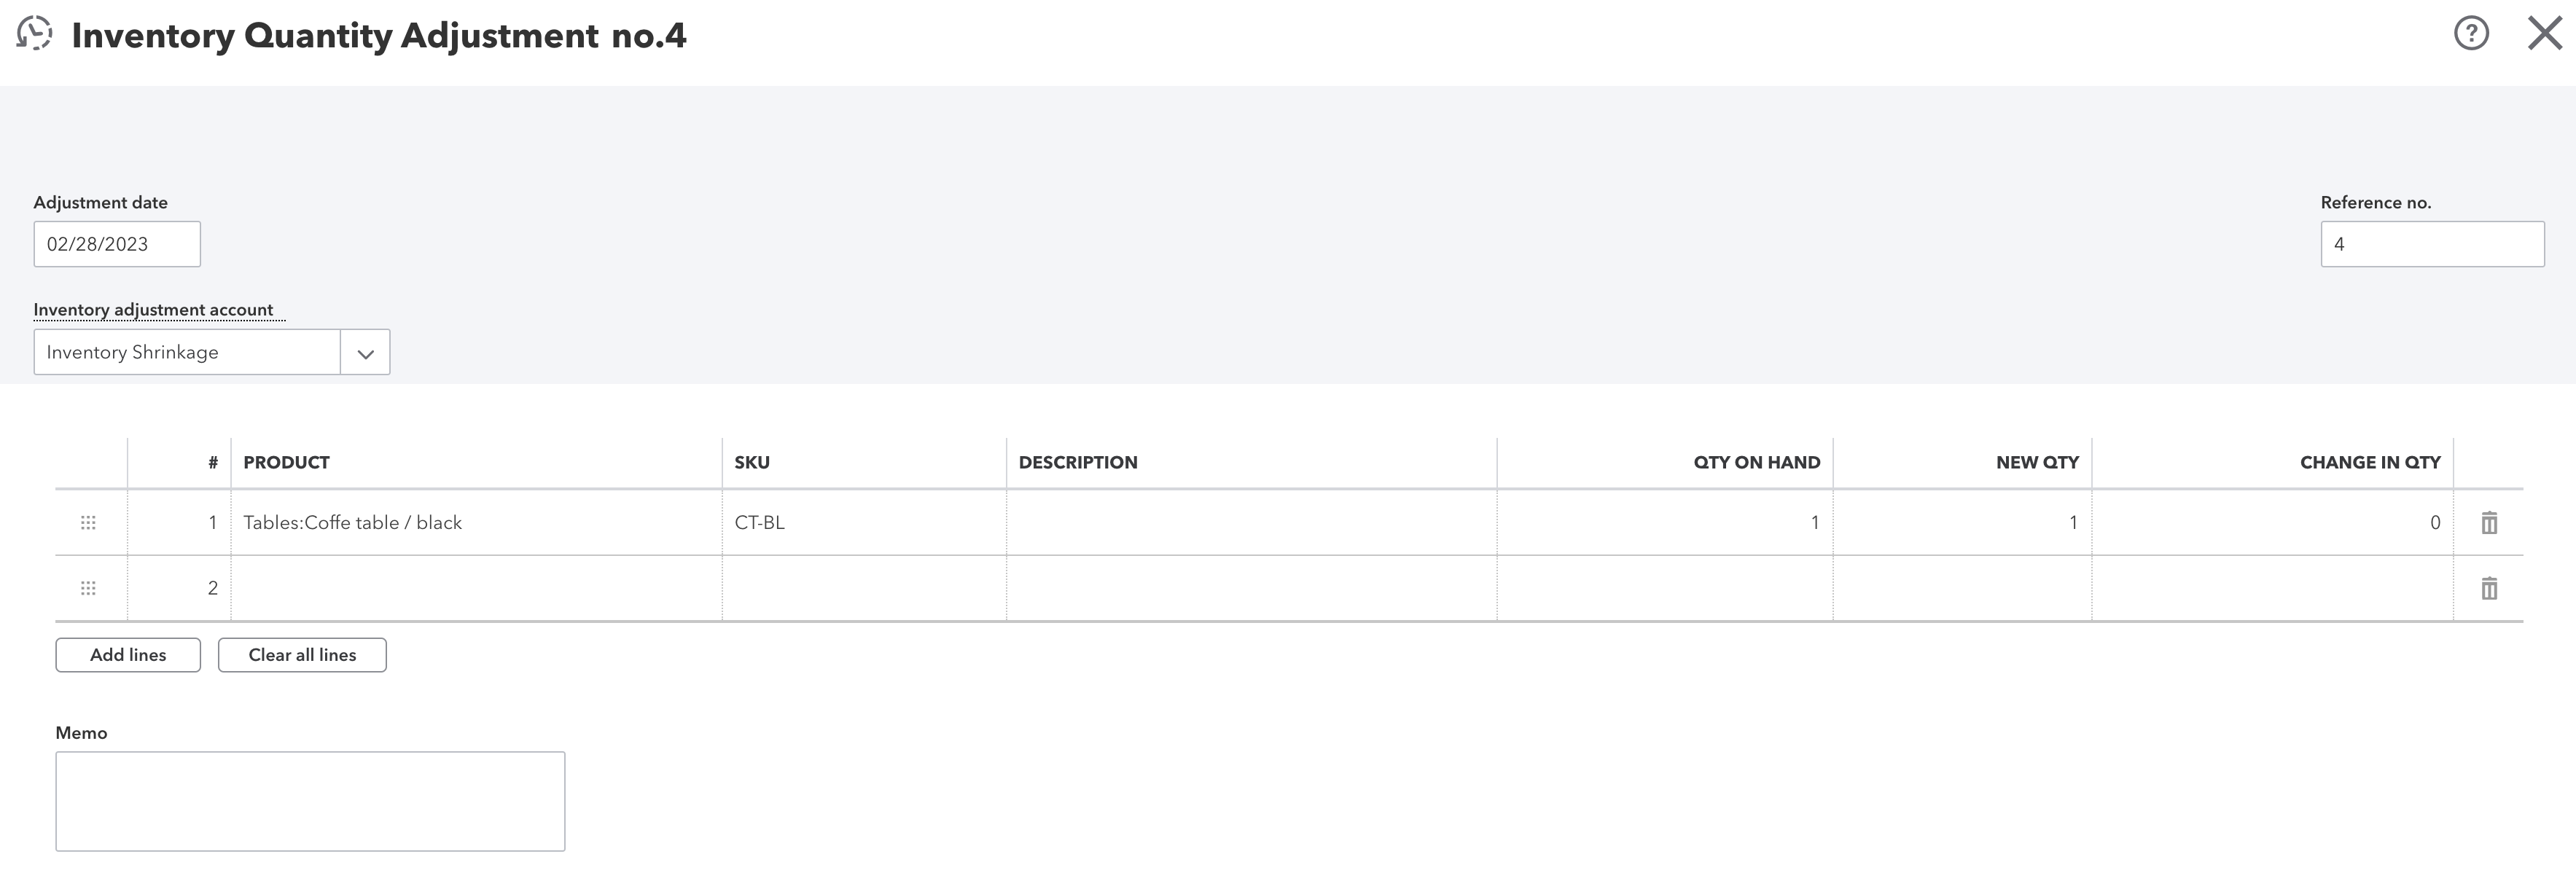
- You now have two ways to actually adjust the quantity of your item — You enter the adjusted quantity into New QTY, or you can add the number of items added or lost to Change in QTY. If you want to record a loss of items in the Change in QTY, you can simply type it in as a negative number (i.e. -2 if you want to record a loss of two items).
Note that you only need to record your adjustment in one of the two fields — Change in QTY or New QTY. The other one will update automatically, so just go with the one that is easier for you.
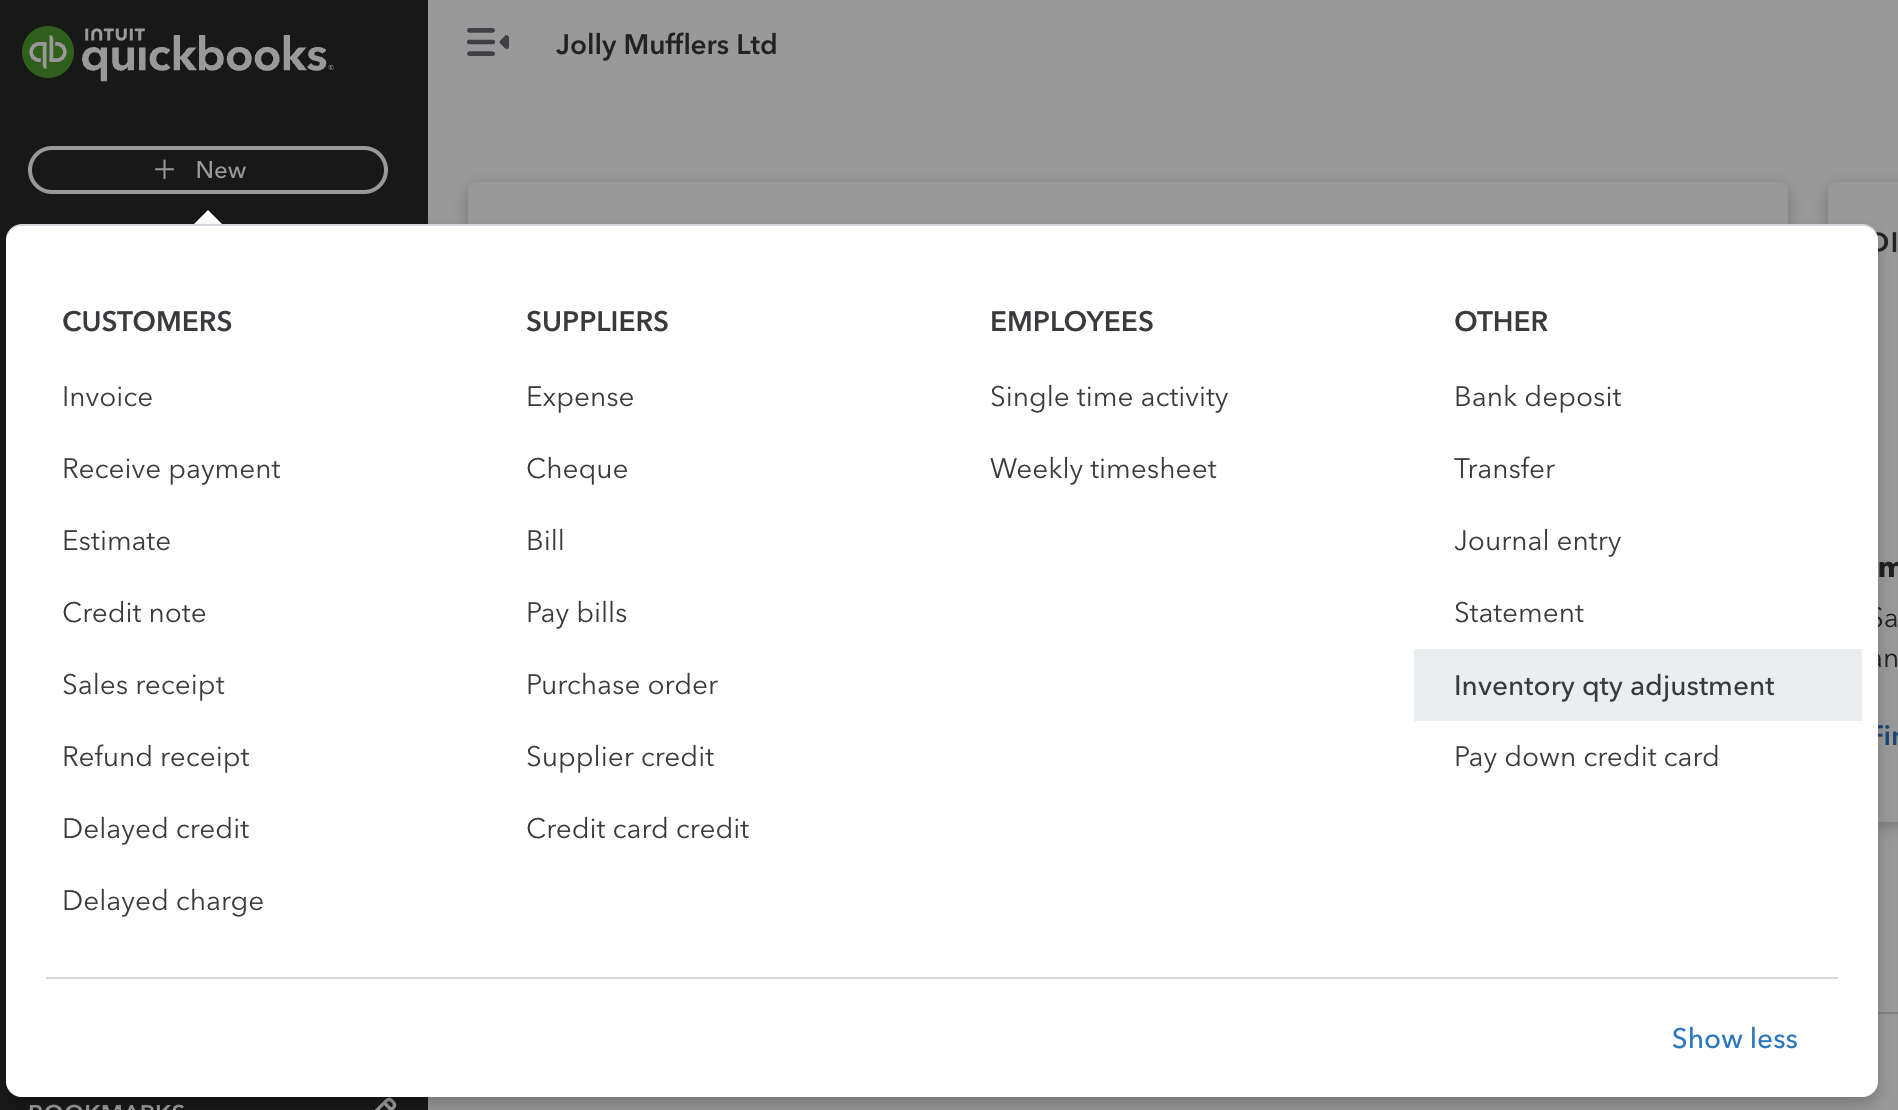
Alternatively, you can also adjust inventory quantity on hand by:
- Selecting New from the top left, then select Inventory qty adjustment. You will get to the same screen we covered above
- Setting the adjustment date
- Under the Inventory adjustment account menu, you should be able to see the adjustment accounts you created earlier. Select the right one.
- Under Products, select the product you need to adjust for. You can either change the quantity or add a new one, depending on your needs.
- You can add the specifics of your adjustment in the Memo field
- Click Save and close
And you’re done! QuickBooks Online will update your adjustments to your stock Asset and COGS accounts automatically.
Can you edit an inventory adjustment in QuickBooks?
If you’ve made a mistake in your QuickBooks inventory adjustment, you can also go back and change it. Here’s how to change inventory in QuickBooks:
- Go to “Search” and then “Advanced Search”
- Select the inventory adjustment account in the “Inventory adjustment account” menu
- Go to “All transactions” and then select “Inventory Quantity Adjustment”
- Select “Search” and find the adjustment you want to edit

Sync your inventory adjustments with Katana manufacturing software
Now that you’ve learned how to do inventory adjustments in QuickBooks, you’ll want to pair it with the right ERP software. Katana’s ERP software can be synced to QuickBooks. Whenever you make an inventory adjustment, it can also be updated to Katana.
Katana also comes with many other features that can help you truly keep all your manufacturing needs on, such as:
- Accurate costing
- Insights on your sales orders
- Production planning
- Purchase order management
And there’s much more to it than that! Book a demo with Katana, and take your business to the next level.
You can connect your QuickBooks information to Katana easily. Here’s how to do it:
- Go to the “Settings” tab in Katana
- Select “Integrations”
- Select “QuickBooks”
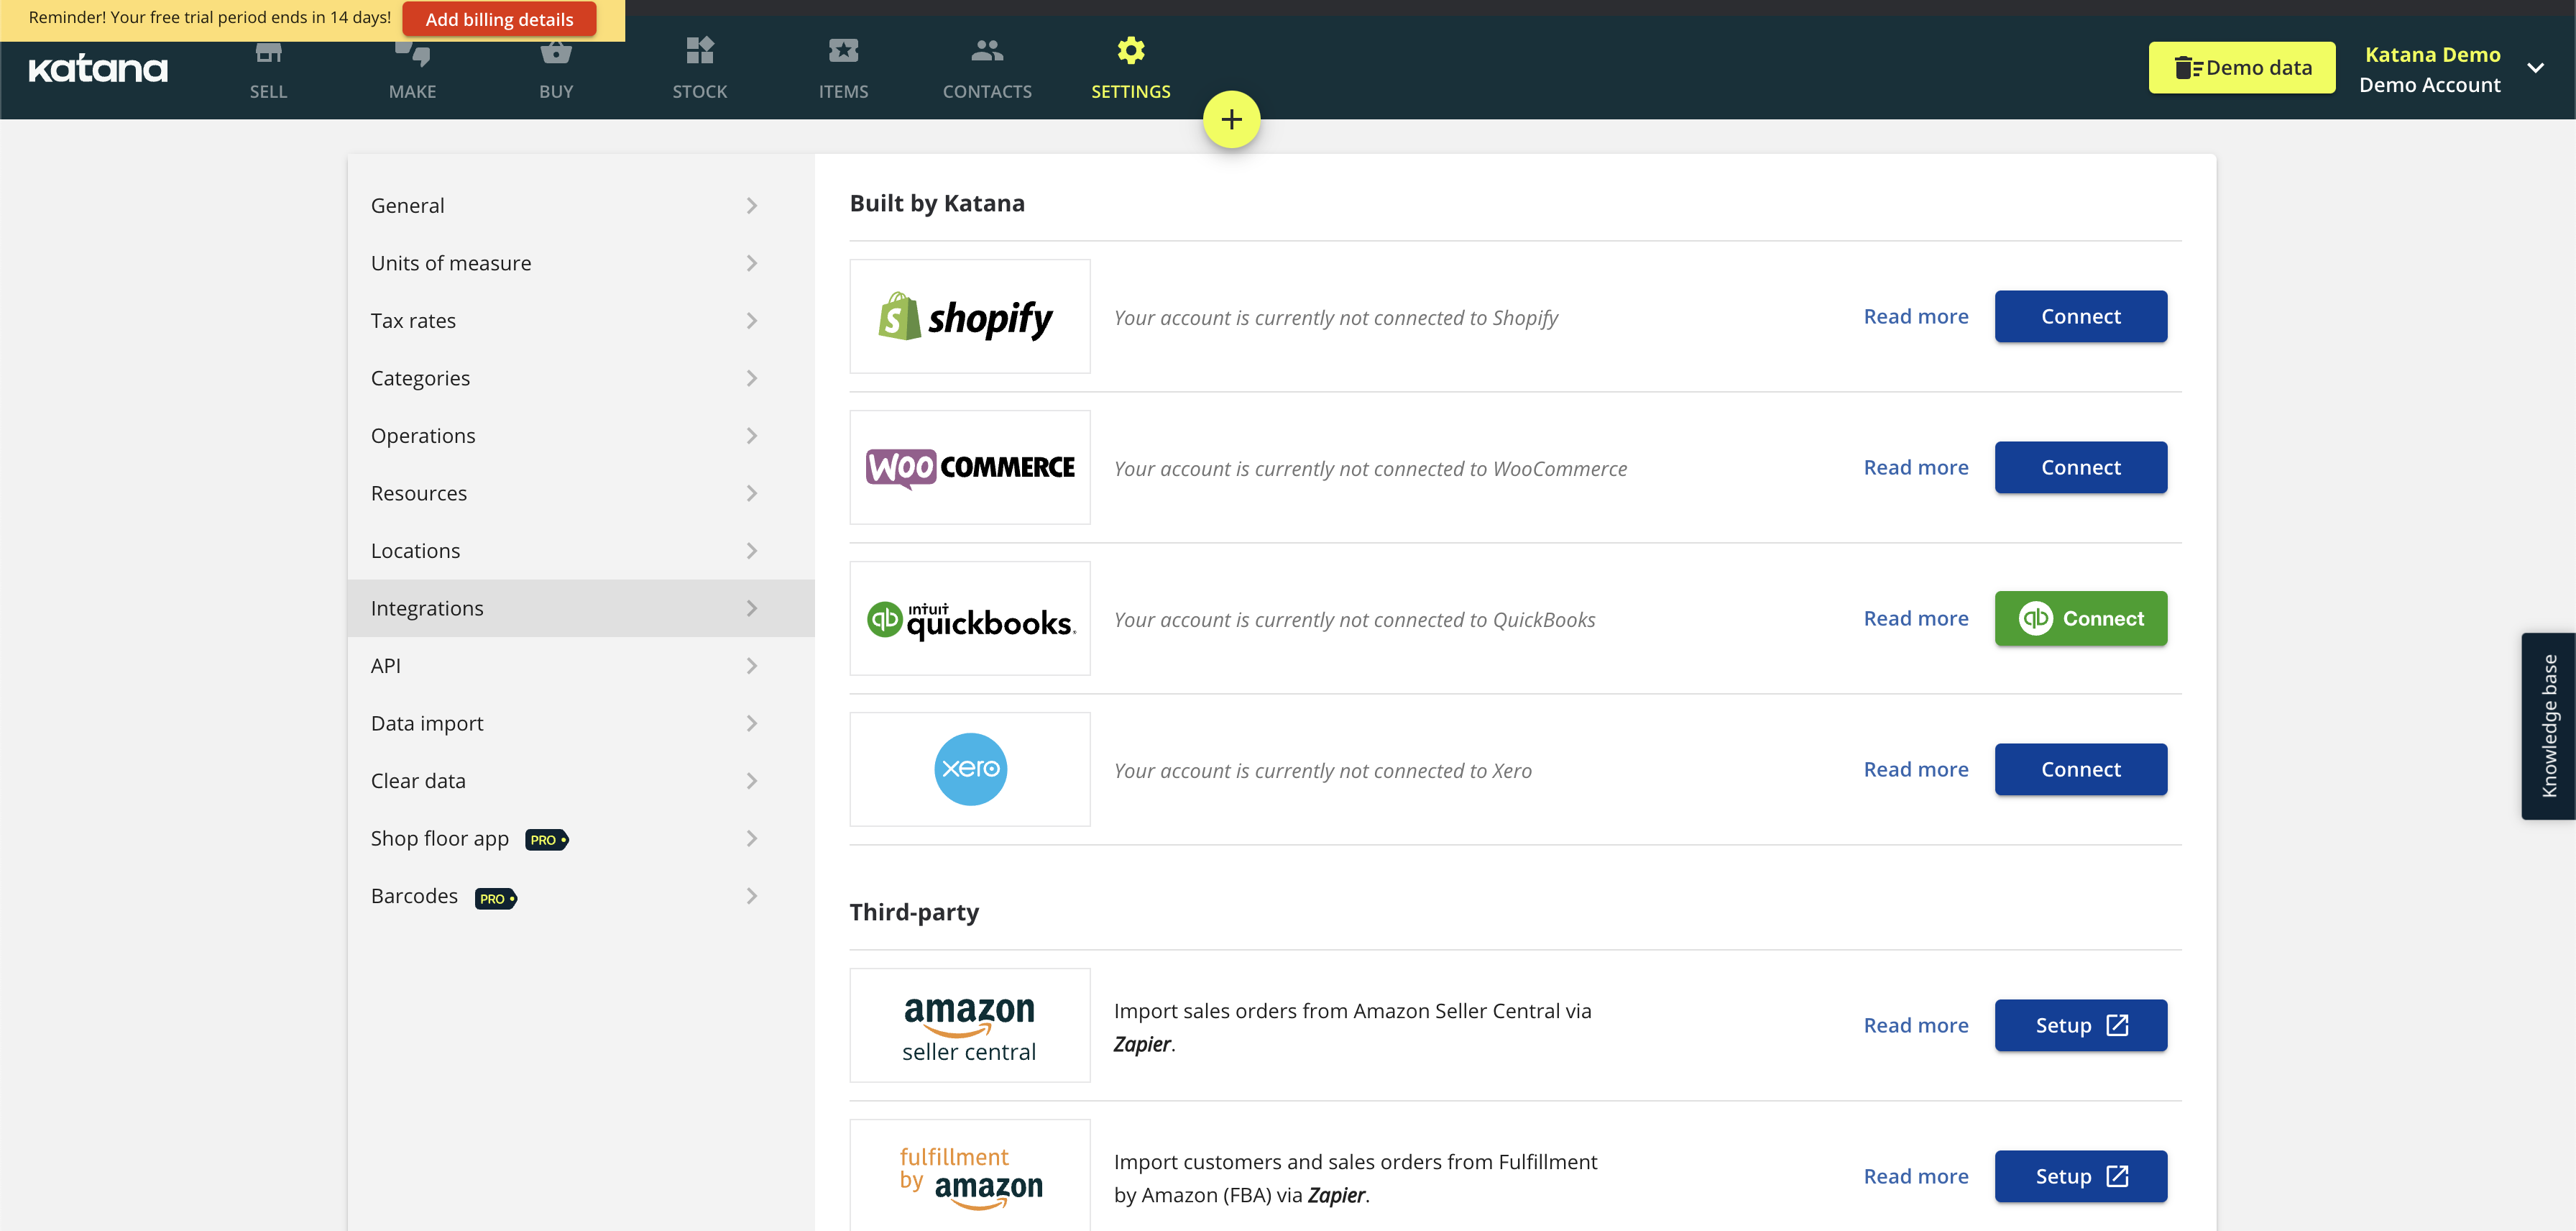
Here you can configure exactly which areas of Katana you wish to connect with QuickBooks. For instance, you can match your inventory items in Katana to your inventory items in QuickBooks. So, whenever you create a new item in your Katana account, that item will also be added to your QuickBooks account unless you’ve got a matching item in your QuickBooks account already (so you only have to update one, and it will avoid creating any duplicates).
Get inventory trends, news, and tips every month
Explore all categories
Get visibility over your sales and stock
Wave goodbye to uncertainty with Katana Cloud Inventory — AI-powered for total inventory control
